I warned you there would be more to come...
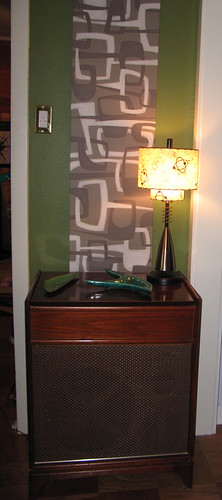
You remember my matched pair of fiberglass shades, right? They were yellowed from years of dirt, the metal hoops had turned brown and their lacing had disintergrated into fragments... These two were not in a happy place!
It was time to act and to coordinate a rescue effort. I removed the pieces of old lacing and the metal hoops, then smoothed off the corrosion and other yuckiness from the hoops with fine steel wool, and washed off any greasy residue. Now the hoops got several light coats of fresh gold (or brass) metallic paint to replicate the original finish. You could have the metal parts professionally plated, but ummm, I don't have any relatives in that line of business ;)
Next it was time for the fiberglass shades to get some attention. They weren't stained, just that overall they could use a thorough cleaning. I read somewhere about a fiberglass boat cleaner which might be used to reverse yellowing, but I was not willing to experiment on two irreplacable shades. I went with something less drastic, I filled the bathtub with mildly warm water, enough to immerse the whole shade and gently scrubbed any bug spots with a small bristle brush. The shades really soak up the warm water and it seemed to help smooth out some minor dimples too. I didn't use any detergent, otherwise I'd start with a dishwashing soap like
Dove.
I had done some research if
chlorine bleach might help brighten the yellowing, but after a little Googling I found that any products containing
chlorine bleach could actually set stains in fiberglass, so I dropped that idea. And of course abrasive cleaners aren't recommended for
fiberglass either.
After their bath I padded the two shades down with a bath towel so they weren't dripping wet and to help avoid any risk of water staining while they air dried. The results: though there's discoloring from age, they were noticably brighter after being cleaned.
Next up: there was the lace situation to be tackled!

Now that they were cleaned, the two shades could have the hoops reattached with new lacing. I went to
Hobby Lobby to see what might be available. In the leather crafts they had a reel of goatskin lace in dark brown in two widths. I brought along a piece of my old lacing to compare and went with the smaller width. They also carried reels available in black, and a wider variety in shorter lengths on cards, including metallic colors (much like my original lamp lace still showed traces of) but the carded laces would have been too wide for my particular shades.
Restitching was the easiest part, with a bit of patience. I started at the seam and gradually tightening the lace as the hoop is secured (but not too tight). I double checked that I ran the lacing in the same direction both top and bottom, otherwise the effect may not have been a good one! Finally the two loose ends of the lace were tied in a sailors knot, in the same fashion as the original lace was knotted.
The Verdict: I solemnly swear that overall I am pleased with how my shades turned out, Your Honor. And I can testify that today I have a happy matching pair of nightstand lamps again!
= = =
A Friendly Disclaimer: This example illustrates what I did to repair my shades. I am NOT a professional fiberglass lamp restoration expert. Individual results will likely vary. You may choose to follow my methods, but I cannot be held responsible for any unforeseen results, including further staining, accidental dismemberment and worse. Please use your own common sense and judgement before proceeding!
Cleaning tips from:Dealers and Suppliers:


.jpg)